15 Tips For Great Landscape Photography
Improve Your Landscape Photography With These 15 Great Tips
Next to people, nature and landscapes are the favorite subjects of most photographers. Especially while traveling, images made while wandering the globe and through beautiful places conjure up memories of these places we’ve visited. When we view these images later, they call to mind all of the senses we experienced, the emotions we felt in those places, and in those specific moments.
It’s important to remember that good nature photography is challenging by its nature. Converting a three dimensional world into a small two dimensional rectangular representation is not an easy task to accomplish. To take great photographs of nature and the outdoors, you’ll need to capture spaciousness, and/or intimacy, lots of energy or serenity, simplicity or multiple layers of detail, or simply an exquisite image of natural phenomena. There are lots of rules in photography, but they can’t all be followed all of the time. In fact, there are plenty of times when the rules simply won’t work and should be ignored completely!
Below you’ll find 15 great photography tips that will help you create great landscape images.
1. Use A Tripod For Great Landscape Images
One thing you want to try to achieve in your landscape photography is sharpness throughout the entire image. The best tip to achieve uniform sharpness in your photography is to use a tripod that is sturdy enough for your camera. You’ll need have your aperture stopped down to maximize the depth of field as well, which requires longer shutter speeds. Tripods are the key to ensuring that images taken with slower shutter speeds don’t include any unwanted blur.
Tripods can vary widely in both cost and quality, so be sure to balance your budget with a quality tripod. There is a good review of the best five travel tripods under $200 right here.
2. Maximizing Depth Of Field
Another tip for achieving great landscape images is to increase the depth of field in your camera. Closing down the aperture, meaning higher f-stop numbers on your lens, will bring more of the image into clear focus from front to back. Each lens has its own sweet spot where most or all of the image is in focus. You can experiment to find the sweet spot in the lenses you use fairly quickly. Try stopping your aperture down to f/11 or f/16 with your camera set for manual focus. Turn the focus dial with the “focus peaking” turned on in your camera. This will show you what parts of your image are in the sharpest focus. Try stopping your aperture down again and do the same with your focus peaking. Once you’ve found an aperture that allows your whole image to be in focus, then you will have found the sweet spot for that lens. Remember it for your next image! Read more about Depth of Field (DoF) here.

This image was made using an aperture of f/13 to maintain a wide depth of field.
3. Finding Your Focal Point
Another tip for getting great landscape photos may be a bit obvious to some, but is nonetheless very important. Every image needs to have a focal point for the viewers eyes to go to. Essentially, the focal point in your image is your main subject. The focal point is where you want your viewers eyes to be guided to in your image. The viewer should be guided to the point of interest in some way, perhaps by using leading lines or framing the image through a hole in a rock formation. However, the point of interest should not always be in the center of the frame. these photos can sometimes appear a bit boring to the viewer, where an off-balance composition can be much more entertaining to the eye.

This image uses the focal point of the sign, along with the arrow pointing toward the rising sun to take the viewer’s eye through the image.
4. Finding Your Foreground
When you look to compose your image, you should always be looking for what is in front of your subject. Look for negative space that could reinforce the image, or possibly elements in the scene that could be used to frame your subject. Check if there may be colors that could complement the subject or contrast with it.
Moving back a bit and using the foreground to help enhance the subject and its environment is a great tip to follow when composing your photographs. The background is usually used to put your subject into context, but you can also use an interesting foreground to highlight the subject and add to the scene.
One great way to make the subject pop is to have a darker contrasting foreground. The dark foreground can frame the subject and lead the viewer deeper into the scene. to the contrary, adding to much contrast between the foreground and the subject can actually be distracting, so try not to over do it.

This small palm tree and grassy area act as the foreground in this image, with some leading lines taking the viewers eye toward the sunrise in the background.
5. Leading Lines
Using Leading lines is a very common use to lead the viewers eye toward the subject of your image. This technique usually involves using something as simple as sidewalk lines, a railroad track or a windy road which would lead the eye into your subject. Whichever lines you are able to find and choose, try to use them to your advantage, and look out for too much foreground activity that could distract the viewer. A quick tip here is to make sure that your leading lines don’t lead away from your subject, but instead lead your viewer’s eye to the subject.
Leading lines give your image depth and scale, as well as providing a more three dimensional look to your photograph. If your leading lines are laid out into some sort of pattern, this too can be used as an additional point of interest in the image. The tip with using patterns in your image would be to make sure that it doesn’t muddy up the image and distract your viewer from the subject. Learn more about leading lines here.

The leading lines in this image draw the viewer through the center to the back of the river.
6. Using Movement In Your Photography
Showing movement in landscape images can be tricky sometimes, and may even sound counter-intuitive to the serene environment being captured. However, you can use movement in your photography to greatly enhance your images by adding mood and drama to the overall image.
Although movement in trees isn’t always pleasant due to the blur, it can sometimes be used to show the overall windy weather of a scene. Of course, movement in water is what most people think about when adding movement into our images. A good tip on photographing movement in water where there are also windy conditions and trees, is to bracket your photos and blend them later in Photoshop (or other editing software).
To achieve this blending effect, using a quick shutter speed while photographing the scene will capture the trees and their leaves as a still image with no movement. You would then take another photograph of the same scene with a slow enough shutter speed to smooth out the water to achieve your desired effect. You would then blend the two images into Photoshop, keeping the still trees, and combining the smoothed out waters.

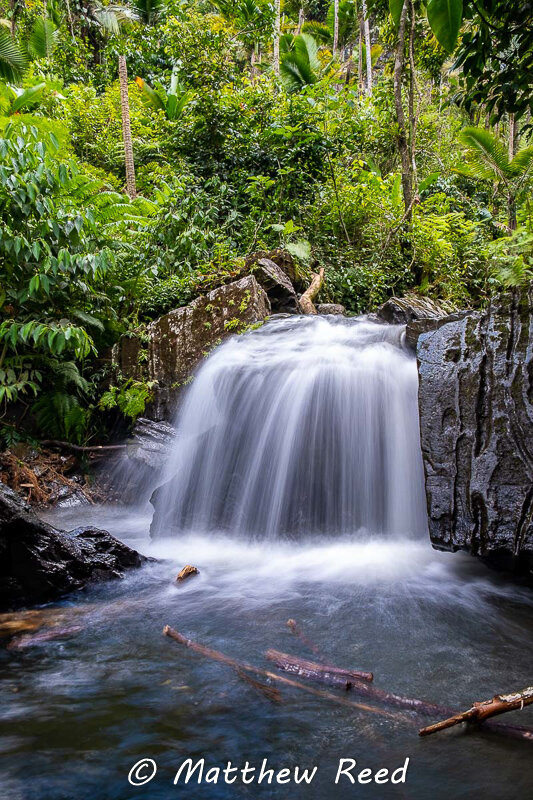
This intimate image of a creek in Puerto Rico was taken with a longer shutter speed to show motion in the water.
7. Using The Sky In Your Landscape Images
There are times where using the sky in your images is more than obvious. When the weather permits, sunrises and sunsets are times when you will want to show the dramatic clouds and vibrant colors in your images. Whether you will use the sky in your images, or how much you will use will probably be pretty easy to figure out while your making your composition. Although bright blue skies are beautiful to look at, they aren’t always photogenic. If the sky takes away from the image or distracts it, consider using less, or none at all if possible.
Most photographers will want at least a percentage of the sky filled with some clouds for their images. Again with the caveat that the clouds you use should at least be interesting to look at. Flat dull grey clouds don’t usually add much to an image, and you may want to avoid them if possible. I usually look for clouds with interesting shape, as well as some contrasting colors that will add to the overall mood of the image. Of course, this doesn’t mean that the sky will cooperate with me. As a matter of fact, it’s usually the opposite with a very stubborn sky, so be patient and good clouds will come (usually)!
8. Use Photography’s “Magic Hours” For Better Landscape Images
The “Magic Hours” are also known as “Golden Hour” and the “Blue Hour,” and are typically the preferred time for landscape photography. Weather permitting, these times produce more pleasing light than during the bright midday sun.
Blue Hour
Blue Hour is the time of early morning between nautical twilight and the golden hour, both which occur before sunrise. In the evening, the blue hour is the time after the Golden Hour, and after the sun is -4 to -6 degrees below the horizon. The blue hour is especially known for the deep blue color that the sky turns, and can make for some very dramatic and color saturated images. At the horizon where the sun is rising will also produce some orange and red tones, which greatly complement the scenes. If you are photographing cityscapes during this time, you will also have the benefit of the lights coming from the buildings.

This blue hour image in Florida pulls in the deep blue of the sky and water.
Golden Hour
The Golden Hour is the time of morning between Blue Hour and just after sunrise, when the sun is just below the horizon, to just above it. This is when the sky turns from red and orange to yellow, or “golden.” In the evening, it is the time before and just after sunset. This light is ideal for landscape photography because it doesn’t cast strong shadows or harsh light. Golden hour is also especially flattering while taking portraits, and creates a nice warm look.
One tip to remember is that Blue Hour and Golden Hour do NOT last a whole hour. To the contrary, sometimes they only last 10 minutes!

A golden hour sunset image taken in a Florida marina.
9. Using Horizons In Your Landscape Photos
When using horizons in your landscape images, there are several things you can consider. Always keeping the horizon in the center if the image can sometimes throw the feel of the image off. Try using the rule of thirds and have the horizon in the lower line when you want to accentuate a cloudy or moody sky. When the sky has nothing of interest to show, place the horizon in the upper line to cut most of it out and highlight your foreground more.
You don’t always need to have the horizon in your photos at all, and some images work out better without it. The biggest tip I can offer is to always, yes always make sure your horizon is straight. Even point and shoot cameras and cell phone cameras have auto leveling horizon lines, so there really is no excuse to have crooked images. Honestly, nothing screams “amateur” more than showing off images with lopsided horizons. If you missed it while shooting, correct it in post!

The horizon in this image was set to the lower third to include more of the cloud shapes and interest.
10. Use A Telephoto Or Zoom Lens To Compose Your Landscapes
When I’m out photographing landscapes, I try to follow a simple pattern: Start with a wide lens to get the whole picture, then use a zoom to move closer into interesting parts of the scene. This will get you a completely different type of image, with a totally new perspective.
Stating the obvious, using a zoom lens will get you closer to your subject and can make it easier to get the image you want, without hiking an additional hour. You can instead bring the subject to you.
One great reason for using a zoom lens with landscapes is compression. Compression will make objects that are far away from each other look much closer than they actually are. If your foreground, mid-ground and background are all miles apart, zooming in will compress each element and make it a much tighter image, with all of these elements close in the frame. The mountain range in the background, for example, will look much closer and have more prominence than it would have with a wide angle lens.

This landscape image was zoomed in to highlight only a section of the vast mountain range.
11. Finding A Point Of View In Landscape Photography
We’ve all had our lazy moments where we pull into a scenic viewpoint, hop out of t he car and take a photo from the exact spot that countless others have before us. Next time you pull into a viewing area or other popular spot for photos, get your feet moving and try to find a different point of view for your subject. If this means taking a little hike to get a better angle, go for it and you will likely come out with a better and more unique image than everyone else standing at the same spot.
In order to shoot this image, I climbed down the bank and set the tripod up in the water. I would not have been able to get this shot from the trail.
12. Shoot Your Landscape Images Low To The Ground
Always shooting your images from your typical standing height can start to get a little boring after a while. Use your tripod on its lowest to get close to the ground and you will be able to add a lot of interest into the foreground, as well as showing the whole image from a different angle. Remember to ensure you stop your aperture down to a high number to ensure everything is in focus. Alternatively, you can focus stack several images and blend them in Photoshop to make a perfectly focused image.

This image was captured from very close to the ground to add the foreground elements.
13. Use Auto Exposure Bracketing To Make Better Landscape Images
Auto Exposure Bracketing will ensure that every highlight and every shadow are available to be used in your final image. This technique involves taking multiple images of the scene at different exposure values. Most modern cameras have this feature built in and it is rather easy to use. What happens is the camera will capture the image at the correct exposure, and will take several more images that are underexposed to capture the shadows, and overexposed to capture all of the highlights.
Although HDR photography has gotten a bad rap over the years for looking too unrealistic, this technique is the true meaning of an HDR, or High Dynamic Range photo and is widely used by most landscape photographers. Learn more about HDR photography right here.


14. Use Polarizing Filters For Landscape Photography
CPLs, or Circular Polarizing Filters are a must have accessory for your lenses, and should be used in a lot of your landscape photographs. Polarizers serve several purposes with landscape photography: they deepen the blues in the sky, and they remove reflections from shiny surfaces. This can be important
Although there are many times you not only want a reflection in your image, but the reflection may be your main subject. However, there are times when getting rid of reflections, especially in water, will dramatically improve your image and provide better depth.
15. Add People To Your Landscapes To Add Scale
Add people to your landscape images to add scale to the scene. Often times, the vast landscapes that we photograph are far larger than the viewer realizes, and need something to show the scale of the entire scene. Adding a person to the image can show the viewer how large a mountain, waterfall, or other subject is.
16. Bonus Tip - Shoot At Night
Looking to get really unique and original images? Go out at night and make photographs of landscapes that will stun your viewers.
This sub-genre of nightscape photography combines landscape photography with night time and astrophotography. The longer exposures needed to bring in the needed light will add tons of drama with cloud movement and lighting. Add to the scene by including an interesting foreground, and light it up using a technique called light painting. Be careful shooting these amazing nightscape images though, because they can be addicting!
The following two images were made well after dark in the pitch black. They were lit up using a flashlight to “paint” the trees and bushes with light.

Light painting image taken well after dark.

This image was also captured well after dark, and the surrounding area was “painted” with a flashlight.
I hope you found these 15 tips for great landscape photography useful! Have any other tips? Leave a comment below, and thanks for reading!